Creating Tags:
You will create and print sales tags for each of your items through your online seller's account at MyCM. You may create a few tags at a time, or create all your tags at one time. It is your choice! Below are some easy instructions to get you started!
- Tags include:
- your consignor number
- item price
- if it can be sold 1/2 price during the ½ price sale
- if it can be donated if it does not sell
- a short description of your item
- a barcode for our sale computer system
Getting started:
- Hint: Save time by sorting clothing into 2 groups - boys & girls - and organize each group by size. Makes creating tags go faster!
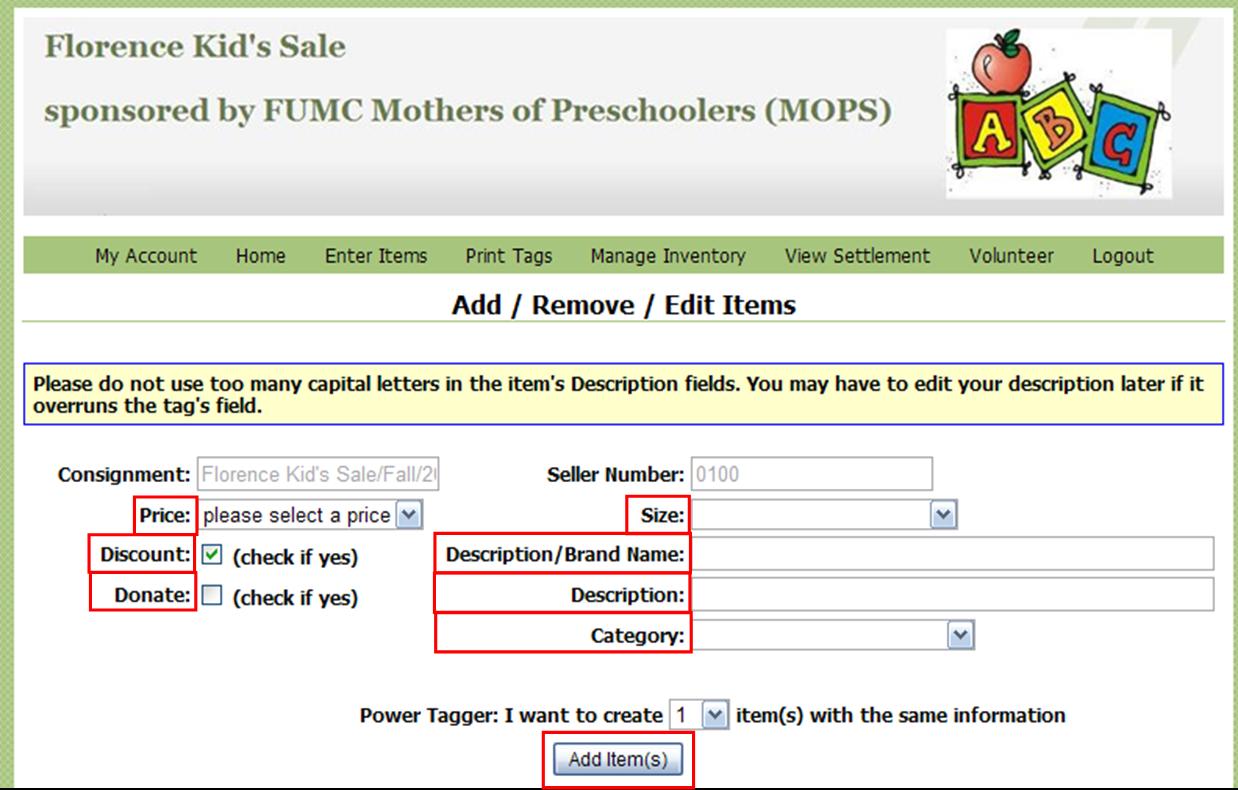
- Log into your seller’s account, and click on “Enter items”. You will see this screen appear (below).

Items in RED are areas that you will fill in for each tag. Below are instructions and tips to keep in mind as you go.
“Price”
- Price items to sell! Consider brand name, age, condition. We recommend about 25-30% of retail price.
- Price in $.50 increments. (ex. $2.00, $2.50, not $2.25)
“Discount”
- Check this box to allow your item to sell for 50% off during the ½ price sale.
- Just remember it is better to sell it than to put it back into a closet you just cleaned out!
- If this box isn't checked, your item will remain at full price during the half price sale.
"Donate”
- Choose to donate the item (check this box if you want to donate the item if it doesn’t sell)
- If you choose this for all your items, you don’t need to pick up anything after the sale!
“Size”
- Choose the size
“Description/ Brand”
- Enter a short and catchy description for each item. If possible, call out name brands and “hardly worn,” “never worn,” “new with tags” in the description.
- Please try to include something unique that can help to identify that item. This helps in selling the item, as well as reuniting tags with items when necessary.
“Category”
- Please choose the category that best describes your items within the categories offered.
“Power Tagger Option”
- Use this to create multiple tags at once (saves time if you have many similar items!). And, you can go back and add / edit information to each one if you’d like.
“Add Item”
- Please be sure to do this to add your item to the inventory.
Repeat these steps until you are finished adding items. You can always log out and finish later.
IMPORTANT: The deadline to enter or edit any items into your inventory is Sunday, May 3rd at 11:59pm! After this time the sale will be LOCKED and no further changes allowed.
Please Note: There can be NO handwritten tag changes. Any changes must be made through your account and a new tag printed. No exceptions as the scanner only reads the computer generated tag.
See a master list of your tags to date:
At any point, you can create a master list of all the items you have entered.
- Log into your seller’s account, and click on “Manage Inventory."
- At the bottom of the screen is a table. In the table, click the box for “check all”.
- Then click on the green “Reports” box to the right and select “Inventory Report”.
- You may then Print or save to your computer, or both.
- (***If you plan to donate items, be sure to repeat this step at the conclusion of the sale to determine the items you donated for your tax records!***)
Printing your tags:
After your tag(s) are created, you are ready to print. You may print a few tags at a time, or you may wait until all your tags are entered and print everything at once. It is your choice!
To Print:
- Log into your account, and click on “Print Tags" NOTE: Please log in through a link on this website. If you go directly to MyCM and log in it will ask you for a print code which isn't available. Logging in via this site bypasses that.
- Click on the link “Click Here to View Instructions to Generate Your Tags' Printout”. This will walk you through how to print your tags.
Printing Tips:
- Paper:
- No dark colored paper, only light or pastel card stock - WHITE is the BEST choice; no fuzzy or textured paper (because the barcodes will bleed)
- Best type paper: 60# - 67#, 110# card or cover stock.
- Copy paper is ok too.
- Do not put tape on the barcode.
- Printer:
- Best Printer: ink jets with normal toner (no dot matrix printers)
- Printing Settings: Use NORMAL or DRAFT. (Avoid "Best" quality because it is too dark and causes the barcodes to bleed)
- Print with "Black Cartridge" only.
- Helpful Tip: Print one tag first to make sure the barcodes are crisp and clear and not bleeding. Then, print the rest.